Toyota Sequoia Maintenace – Headlight Bulb/Assembly Replacement
Is everything okay with the headlights on your Toyota Sequoia? If one has stopped working or if you're thinking about replacing the entire headlight assembly, here’s a comprehensive guide to help you through the process.

Swapping out the headlight bulbs on your Toyota Sequoia isn’t overly complicated. It's certainly easier than navigating rough terrain!
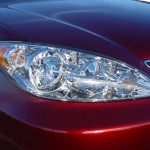
Replacing the Headlight Bulb
Start by examining the back of the headlight assembly. There should be a rubber gasket located at the rear of the headlight. Once you remove this gasket (which serves as a moisture seal), you’ll notice a wire securing the back of the bulb. Squeeze this wire gently to release the bulb. Install the new bulb carefully, making sure not to touch it directly with your fingers, as the oils from your skin can shorten its lifespan. Afterward, reinsert the wire and reinstall the rubber gasket.
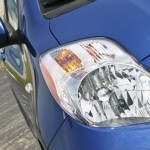
Replacing the Headlight Assembly
To swap out the headlight assembly, you’ll need to locate and remove the bolts holding it in place.
Here’s what you need to do step-by-step:
- Begin by removing all the bolts along the top of the assembly.
- In most model years, there will also be a bolt on the side that needs to be taken out.
- Additionally, there is typically a bolt positioned below the assembly. Depending on the model year and your reach, you might need to shift the turn signal mechanism aside to access it.
- Once all these bolts are removed, the headlight assembly should come loose.
- Take out the old assembly and replace it with a new one. Then, simply reverse the steps above to complete the installation.
Having headlights that function correctly—without cracks, yellowing, or scratches—is crucial for safe driving in various lighting conditions. By following the instructions provided, you should end up with a brand-new headlight assembly and/or fresh headlight bulbs.
Related Posts
-
 Toyota FJ Cruiser Maintenance – Headlight Bulb Change And Assembly Removal
-
 2002-06 Toyota Camry Maintenance – How To Change Headlight Bulb/Assembly
-
 Toyota Sequoia Maintenance – Replace Brake Pads
-
 Toyota Sequoia Power Window Failure Guide
-
 Toyota Yaris Maintenace: Headlight And Taillight Replacement
-
 The New Standard Features Of The 2010 Toyota Sequoia
Remember, maintaining proper lighting on your vehicle is essential for both safety and compliance with road regulations. If you encounter any issues during the process, don’t hesitate to seek professional assistance. Stay safe on the roads!
Customized Electric Chillers,Multi Energy Absorption Chiller,Centrifugal Chiller,Screw Chiller,Gas Fired Absorption Heat Pump
EBARA REFRIGERATION EQUIPMENT & SYSTEMS (CHINA) CO., LTD. , https://www.ebara-hvac.com